Showing posts with label breakfast. Show all posts
Apple Cinnamon Breakfast Donut Muffins
I haven't posted in quite some time, but that doesn't mean I haven't been cooking! Here's some things to catch you up...during the hurricane life without power was getting pretty dull. Lucky for us we had a generator and were able to crank up about half the house...so I started baking. These muffins I've had pinned for quite some time, and these photos were from the second time I made them. The recipe is from Sweet Pea's Kitchen called Brown Sugar Pecan Pear Muffins
However, I swapped out pears for apples because I had them on hand, and also omitted the pecans. I also glazed these muffins from another one of Christina's recipes found here: Glazed Donut Muffins
These muffins are so easy to make, although I was really surprised at how THICK the batter was. It's REALLY thick, so be forewarned...they'll still cook up fine! I thought at first I had forgotten an ingredient, but nope. all was well.
Once cooled, Dip them in the glaze mixture and let it set...Super delicious muffins!
Cinnamon Swirl Bread
The other day, despite it being almost 85˚ out, I felt like baking some cinnamon swirl bread. I found this recipe for Homemade Cinnamon Bread from the Pioneer Woman. She has some seriously detailed photos and instructions on her page if you're interested. I did however, follow her instructions and after an entire afternoon of mixing, rising, rolling, rising and baking the bread was finally done.
I didn't begin taking pictures until after I had already added the cinnamon sugar, rolled the bread and let it rise for the second time. So here's what it looked like before going into the oven:
Finally I sliced into it and the hubby and I split a few slices while it was still warm. It was pretty good. A little dry actually, but pretty damn good.
Then this morning, it was time for cinnamon toast:
It was much more delicious toasted with butter. So delicious in fact, that I think I'm going to make another slice now...
Easy Cherry (or apple) Turnovers
I told my parents about this blog when I first started making it. My Mom is about as adorable as they come, so she always looks at the new things I post and then tells me how nice they look or asks how they came out. My Dad on the other hand is lucky to check his email once a week let alone read my blog. When I asked him if he wanted to see it he informed me he "doesn't do blogs, just like he doesn't do FaceBook" I told him there was nothing to "do" but look at pictures really, and he didn't even have to read it. It was merely an online journal about what I bake.
I emailed him the link (again) about about a week ago he finally looked at the blog. This must've gotten him thinking about all the baked goods that he really likes, because after joking with me about how I must "think I'm Betty Crocker" he confessed he was wondering how he could make cherry turnovers "like the kind you get from the bakery" (as he made gestures of eating said turnover while it flaked apart all over this shirt). He also said he wanted to be able to make them "on-demand" and with "little effort". I was all over this, and promised I'd be back the following weekend ready to bake. The following weekend I returned at their house for his personal Cherry-Turnover baking lesson.
The recipe I chose was this one: Easy Apple Turnovers over at Lawfully Wedded Wife.
I significantly cut it down for my father's ease, But in all fairness I did try her Apple Filling recipe for my own personal benefit. (For the record, it was DELICIOUS!!!)
Use one sheet of Puff Pastry, defrost for 40 minutes on the counter. In the meantime, Preheat the oven to 400˚.
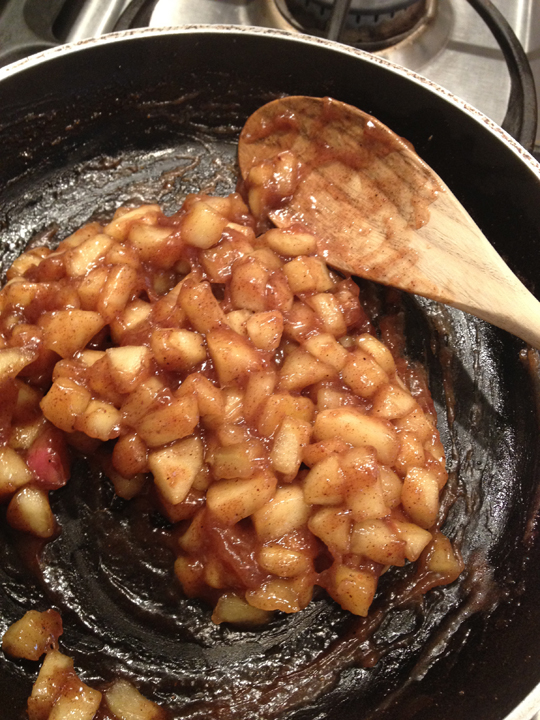
Like I said I did make the apple filling for myself, so here's a pic (it came out perfect):
We used a can of Cherry Pie filling - found in the baking aisle (for "instant" filling).
Then, unfold the puff pastry sheet and cut into 4 squares - fill 1/2 of the square with the filling.
Fold the square from corner to corner and pinch edges together to seal in the filling.
Now they're ready to bake! Put them in the oven for 20-25 minutes - until golden brown and puffed up:
Remove from pan and move to rack and let cool completely.
In the meantime mix up the icing:
2 tsp of mik
1/2 cup confectioners sugar
Once cooled, pour icing over the top of the turnover....Tada!
Banana Nut Oatmeal Cookies
Seems everyone I know lately is watching what they eat...which is why last weekend when we celebrated my mother in law's birthday my brother-in-law's girlfriend made the most amazing low fat and WW friendly cookies. These were some of the best cookies I've had in a long time – so good in fact, that half of the cookies she brought were eaten before dinner! I was lucky enough to have 2 that night before they were devoured!
She told us the recipe came from Skinny Taste - Chewy LowFat Banana Nut Oatmeal Cookies. I've heard of this site before and after making this recipe I'm sure I'll be back.
Gina @ Skinny Taste says:
Serving Size: 2 cookies • Old Points: 4 pts • Points+: 5 pts
Calories: 175.8 • Fat: 6.7 g • Protein: 3.5 g • Carb: 28.3 g • Fiber: 1.6 g • Sugar: 14 g
The recipe goes like this:
1c flour
1tsp baking powder
1/2 tsp baking soda
1/2 tsp salt
1/2 tsp ground cinnamon
2 tbsp unsalted butter room temp.
1/2 c sugar
1/2 c unpacked brown sugar
1 large egg
1/4c mashed ripe banana (I used 1 whole banana)
1/2 tsp vanilla extract
2 c quick oats
3/4 c chopped walnuts
Preheat oven to 350˚.
1. Mix first 5 dry ingredients together in a bowl and set aside.
2. In large bowl mix butter, sugars, egg, banana and vanilla.
(Note: I had received a mortar and pestle for Christmas from my sister and thought I'd pull it out to mash the banana - not sure if this is what one might use to mash a banana - but it worked.)
4. Add the nuts and combine well.
(Note: I also decided to chop the walnuts a bit finer then the way they came.)
5. Drop spoonfuls of mixture onto a parchment lined cookie sheet. (Note: Parchment is amazing for baking, I never ever bake without it - Not only does it seem to help prevent burning and sticking to the pan but cleanup is practically nothing!)
6. Bake for about 10 minutes. Just until they begin to brown. Do not overcook otherwise they'll be crispy as opposed to chewy.
7. Let cool on tray for 3 min then transfer to rack to finish cooling.
Makes about 36 cookies. Enjoy!
Italian Baked Pan-Cake
My sister sent this recipe to me the other week and swears she's been wanting to make this every day since she made it this first time. So finally I decided to give it a go. This is the recipe she sent (in her words) She says it's from Gourmet Magazine - although I could not find a site to link to with the same recipe:
3/4 c. all purpose flour (GF works too.)
2 eggs
1/4 c. sugar
1 tsp. vanilla
1 c. milk
• Preheat oven to 450, put a cast iron skillet in there when you turn it on, so that it gets heated too.
• Mix all the above ingredients in a bowl.
• When the oven is hot, open it up and put 1 or 2 Tbsp of butter in the skillet, roll it around to coat, and return it to the oven for 1 minute to brown.
• Then pour in the batter. Cook until puffed, set and golden, about 20-25 minutes for a 12" skillet.
• Let sit for 5 minutes before serving. (It will sink)
• I served it with mixed berries and agave nectar. But syrup would be great alone too. The recipe called for serving it with Nutella that's been thinned to pourable consistency with milk. I didn't try that, but it sounds great. Either way, it was one of the best breakfast recipes I've found in a long time. Hope you enjoy!
She's the best. This recipe was delicious. Next time I think I'll try making it with cinnamon and apples as well. I'm sure it won't be too long because I, like her, want to make this every day!!
Enjoy!
Subscribe to:
Comments (Atom)


