Turkey Spinach Gyoza

THE FIRST NON-DESSERT POST!!!


Last weekend I made this recipe for the girls when we got together sat afternoon for some apps & desserts: Southwest Egg Rolls from Cake & Allie, BUT I DIDN'T TAKE ONE PICTURE. However the adventure left me with a excess amount of egg roll wrappers that I had to either freeze or use within 7 days. So it was off to find more egg roll inspired recipes.

What I made was adapted from this recipe: Chicken Gyozas

I used what I had, so it's been modified quite a bit. Here we go:

Filling: 
1 lb ground turkey
1 package frozen chopped spinach
1 tbsp chopped garlic
1/2 tsp powdered ginger (I didn't have any fresh on hand)
6 green onions sliced thin

Next up, I had to cut the wonton wrapped in quarters so they would be the correct size. Please keep in mind I was working with squares instead of rounds and I didn't have time to get all fancy-like with the folding.

I added about 1 tbsp filling in each 1/4 of a wonton wrapper, sealed the edges with water, and set them aside. The recipe said 4 min steamed with a closed lid would cook the filling (I was doubful) but here went nothing...


Shockingly enough, after 4 min, I cut one open to check and it was fully cooked! Woohooo!!!


For the dipping sauce I used some of this: Soy Vay - Veri Veri Teriyaki cut with some of this: Liquid Aminos

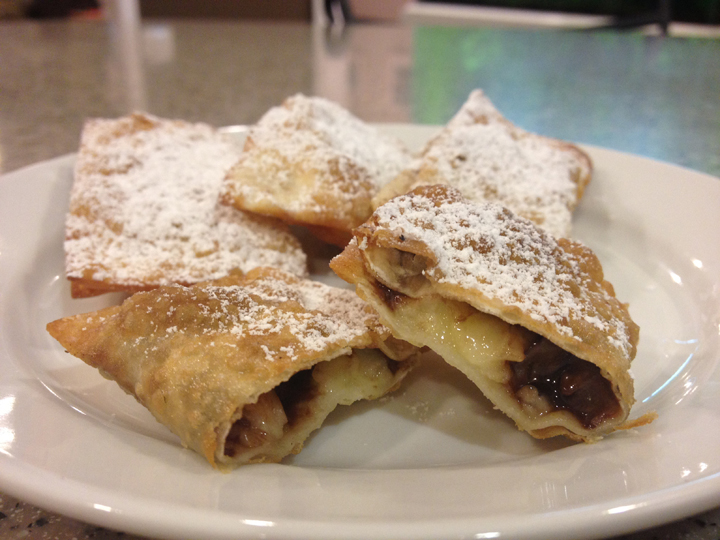
Now it's full steam ahead...I must've rocked out about 48 of these things and still had 12 tiny squares of wontons left over...Next up...Dessert!!


Nutella Banana Gyozas


Okay, maybe they're not technically gyoza since they were fried instead of steamed, but still...the process was the same ;o)

From my previous post you saw I had some extra wonton wrappers left over...which makes for some cooking experiments. Dinner was made so it was on to dessert. This recipe probably exists somewhere, but since it only had 3 (okay maybe 5) ingredients I just came up with it on a whim.


Fill each wonton wrapper with a slice of banana:


Top each with a bit of Nutella:


Fold, seal with water:


Fry in pan and top with powdered sugar: 


Enjoy!!


Pear Dessert

Facing an over abundance of pears I discovered hiding in the crisper drawer I was on a mission to make something pear related for dessert a few weeks back when we went to visit the folk's for dinner.

I finally settled on this recipe: Old Fashioned Pear Dessert I think it's because it has "old fashioned" in the name, and I assume that any recipe that can stand the test of time must be a winner....


Ingredients

  • 2-1/4 cups all-purpose flour
  • 3 tablespoons sugar & 2 tablespoons of sugar
  • 3/4 teaspoon salt
  • 3/4 cup cold butter, cubed
  • 3 egg yolks
  • 4-1/2 teaspoons lemon juice

First you mix up the crust ingredients above, using 3 tbsp of sugar. Then, put 1 cup of mixture aside adding an additional 2 tbsp sugar which will be used for the topping, pressing remaining mixture into a pan. This honestly was the most difficult part. They crust was somewhat dry to work with and crumbly to boot, so it made things a little difficult when trying to get it to stick to the sides.


But mission accomplished and now it was ready for the oven to bake for about 10-12 min at 375˚.

While it was baking I worked on the filling:

  • FILLING:
  • 1/2 cup sugar
  • 4 tablespoons cornstarch, divided
  • 1/2 teaspoon salt
  • 1/2 teaspoon ground cinnamon
  • 3/4 cup water
  • 2 tablespoons plus 1-1/2 teaspoons lemon juice
  • 2 tablespoons butter
  • 1 teaspoon vanilla extract
  • 5 cups chopped peeled ripe pears


Chopping pears & combining sugar, 2 tbsp cornstarch, salt and cinnamon in a saucepan with water and lemon juice stirring til smooth. Bring to a boil and cook for about 1 min until sauce is thickened, remove from heat and add butter and vanilla.


Toss pears with remaining corn starch, spoon into baked crust and pour the topping over the pears. Then sprinkle with the reserved topping.


Bake for 35-40 min or until the top i slightly browned and filling is bubbling.


Now to be honest, I was running late to dinner that night, and took this dessert to the house warm. After dinner, I was so eager to try it I forgot to get some "nice" shots of what it looked like...I only remembered after my first bite, and the desert was half gone. Needless to say it was delicious!! Next time I think I might go a little lighter on the bottom crust...I think it was a bit thick, but other then that, this old fashioned recipe lived up to it's name!