Banana Nut Oatmeal Cookies


Seems everyone I know lately is watching what they eat...which is why last weekend when we celebrated my mother in law's birthday my brother-in-law's girlfriend made the most amazing low fat and WW friendly cookies. These were some of the best cookies I've had in a long time – so good in fact, that half of the cookies she brought were eaten before dinner! I was lucky enough to have 2 that night before they were devoured!

She told us the recipe came from Skinny Taste - Chewy LowFat Banana Nut Oatmeal Cookies. I've heard of this site before and after making this recipe I'm sure I'll be back.


Gina @ Skinny Taste says:
Serving Size: 2 cookies • Old Points: 4 pts • Points+: 5 pts
Calories: 175.8 • Fat: 6.7 g • Protein: 3.5 g • Carb: 28.3 g • Fiber: 1.6 g  Sugar: 14 g


The recipe goes like this:
1c flour
1tsp baking powder
1/2 tsp baking soda
1/2 tsp salt
1/2 tsp ground cinnamon
2 tbsp unsalted butter room temp.
1/2 c sugar
1/2 c unpacked brown sugar
1 large egg
1/4c mashed ripe banana (I used 1 whole banana)
1/2 tsp vanilla extract
2 c quick oats
3/4 c chopped walnuts

Preheat oven to 350˚.

1. Mix first 5 dry ingredients together in a bowl and set aside.


2. In large bowl mix butter, sugars, egg, banana and vanilla. 


(Note: I had received a mortar and pestle for Christmas from my sister and thought I'd pull it out to mash the banana - not sure if this is what one might use to mash a banana - but it worked.)

3. Add the flour mixture & oats to this bowl and combine by hand.

4. Add the nuts and combine well.
(Note: I also decided to chop the walnuts a bit finer then the way they came.)

5. Drop spoonfuls of mixture onto a parchment lined cookie sheet. (Note: Parchment is amazing for baking, I never ever bake without it - Not only does it seem to help prevent burning and sticking to the pan but cleanup is practically nothing!)


6. Bake for about 10 minutes. Just until they begin to brown. Do not overcook otherwise they'll be crispy as opposed to chewy. 


7. Let cool on tray for 3 min then transfer to rack to finish cooling. 

Makes about 36 cookies. Enjoy!


Rainbow cupcakes...


In our family I'm pretty sure that we have every month covered when it comes to birthdays. February's birthday was that of my beautiful mother in law. Since she's usually the one to bake the cakes and cook the dinners for everyone's birthday, on her birthday we all pitched in so she didn't have to do a thing. My contribution was the "cake" or cupcakes as the case may be.

I really liked the look of these Rainbow Cake Jars I wrote about once before and thought there must be a way to make something similar in cupcake form. Sure enough, I was in luck. A quick google search and I came across these: Rainbow Cupcakes. Perfect! I mixed up the cake as specified and divided for the colors.

I lined the cupcake pans with those basic liners you can find anywhere. I chose them because they were thin enough so that once the cupcakes were baked you'd be able to see the layers through the wrapper.

I put about a tablespoon of each color in each liner. and just layered one on top of each other. At first I thought they might blend together too much, but in fact they didn't blend at all. Then I baked them according to the directions. Some of them bubbled the darker colors to the surface but I just covered that with icing later.


I set them aside to let them cool and was very happy with the results thus far.


Next up icing & sprinkles.


Even unwrapped not too shabby...


And the inside looked great...


And of course they tasted even better!


ps - Here's a picture of the celebration...that's my 1 1/2 year old nephew who thinks that every birthday is also his birthday (and of course we all play along because it's so damn cute.)

Cake Pop Love...


Valentines day is just a few days away, so I thought I'd do some sort of baking for the occasion... However, I wasn't really sure what to make...I had a box of Red Velvet cake in the cabinet so initially I thought that might be a good idea, but nothing was really jumping out at me. This is why I was so happy to get a phone call from my sister in law this thursday....

"I want to make cake pops this weekend. Have any time to supervise?" I can't tell you how excited I was. Seriously, ridiculously excited. Turns out she wanted to make some sweets for her man for valentine's day. Helping her completely satisfied my "need to make something valentine's related" and I knew I'd have a good time hanging out with her for the afternoon!

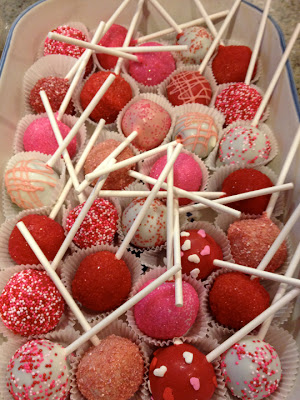
My sister in law G made a chocolate cake and headed down to my house. We went out to get some red and white melting candies and sprinkles for decorations. I'd never made cake pops with sprinkles before but always thought they looked so pretty. After a bit of a rocky start (sprinkles sliding off the cake pops and  cake pops falling off the sticks) we finally found a groove.

G was able to master these cake pops almost immediately. Although she says she's not much of a cook, I do know she's crazy talented when it comes to creative activities and designing. She dipped and decorated almost every single one of these cake pops (with the exception of the 5 or so I did, initially to show her how). They came out so insanely beautiful you'd think she'd done this 100 times over.

I had a great time and couldn't be happier with the results...

Enjoy the pictures!


Things dipped in Chocolate..

Over the weekend I decided to dip other things in chocolate too...Here are some pictures:


Chocolate covered pretzels & chocolate dipped fortune cookies.


Italian Baked Pan-Cake


My sister sent this recipe to me the other week and swears she's been wanting to make this every day since she made it this first time. So finally I decided to give it a go. This is the recipe she sent (in her words) She says it's from Gourmet Magazine - although I could not find a site to link to with the same recipe:


3/4 c. all purpose flour (GF works too.) 
2 eggs
1/4 c. sugar
1 tsp. vanilla
1 c. milk

• Preheat oven to 450, put a cast iron skillet in there when you turn it on, so that it gets heated too.


• Mix all the above ingredients in a bowl. 


• When the oven is hot, open it up and put 1 or 2 Tbsp of butter in the skillet, roll it around to coat, and return it to the oven for 1 minute to brown. 


• Then pour in the batter. Cook until puffed, set and golden, about 20-25 minutes for a 12" skillet. 


• Let sit for 5 minutes before serving. (It will sink)


• I served it with mixed berries and agave nectar. But syrup would be great alone too. The recipe called for serving it with Nutella that's been thinned to pourable consistency with milk. I didn't try that, but it sounds great. Either way, it was one of the best breakfast recipes I've found in a long time. Hope you enjoy!  


She's the best. This recipe was delicious. Next time I think I'll try making it with cinnamon and apples as well. I'm sure it won't be too long because I, like her, want to make this every day!! 
Enjoy!